Facebook & Instagram Business Connect Guide
A step-by-step guide to connect your Facebook pages
Table of Contents
A step-by-step guide to connecting your Facebook and Instagram business pages to the Uberall Listings platform.
For us to keep your location data updated, your Facebook pages need to be connected to the platform. This guide covers two ways to connect: one location at a time, or your whole brand account in a single flow.
Before you start
You must have the right access in Facebook. The user establishing the connection must be an administrator of the Facebook page being connected.
Who can connect on the platform. Admins, Business Managers, and Account Managers can all access the Listing Connections page. Admins see all users. Business Managers and Account Managers see only the users linked to the businesses they manage.
Claiming existing pages. If your business already has location pages, they must be claimed through Facebook first.
Two ways to connect
- Connect an individual location. Best when you want to connect one specific location, or when a page is managed by someone else (for example a franchisee).
- Connect at the account level. Best when you want to connect a brand page, or connect many locations at once. This is the flow we updated, and it no longer requires a Main (Brand) page structure.
Pick the section that matches what you need.
Connect an individual location
Step 1: Connect
Go to the Listings tab of the location and click Connect on the Facebook widget to start.

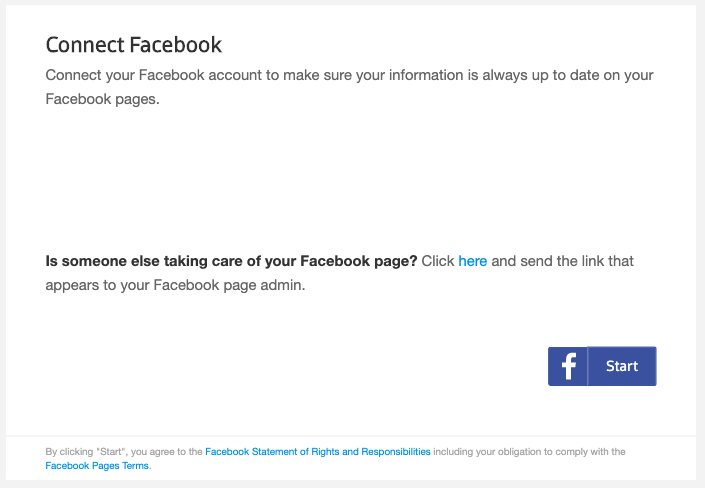
Step 2: Start
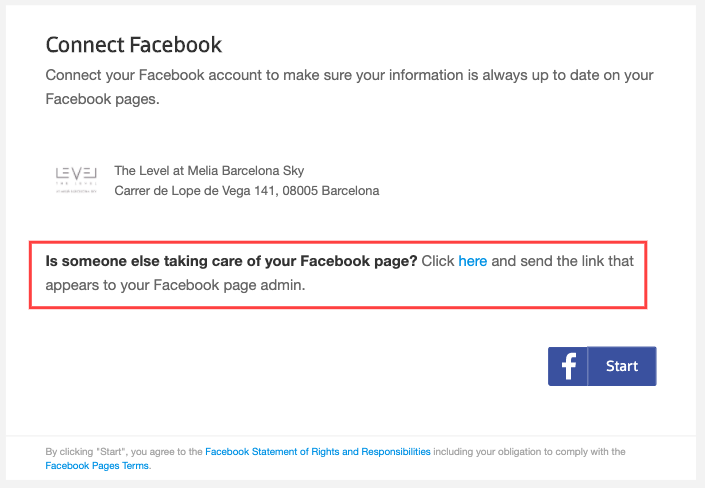
A pop-up opens showing the details of the location you are about to connect.
If you want to connect a page managed by someone else, go to Step 4C. Otherwise, click Start.
Step 3: Sign in and Allow access
Log in with the Facebook account you manage the location with, or want to manage it with.
If you do not have a Facebook account, create one before you can create a Facebook page.
Grant the Local Listing Connector access to your Facebook account by clicking Allow. If you have allowed access before, this step is skipped.
Step 4: Select your location
What you do next depends on the state of the Facebook page:
4A: An existing page you manage. Find the Facebook location in the list and click Confirm.
4B: An existing unofficial (unclaimed) page. Claim the page through Facebook first, then follow the 4A flow.
4C: A page managed by someone else. If the page is owned by one of your businesses (for example a franchisee), send them the link in the connect flow under "Someone else is taking care of your Facebook page?". They sign in to that Facebook account and confirm the connection in a few clicks. Once they approve, the connection is complete.
Connect at the account level
This is the fastest way to connect a brand page or many locations at once.
What changed: You no longer need a Main (Brand) page structure to connect in bulk. You can now connect any brand page (a parent page or a standalone page), or connect all your locations with no brand page at all. The flow starts by connecting your Facebook user, then searches that user's full account for the pages you can link.
Step 1: Add a Facebook user
Go to Businesses > Listing Connections, open the Facebook section, and click Manage Users.
If no user has been added yet, you will see a prompt to add one. Click Add New User and log in with the Facebook user that has access to the pages you want to connect.

Step 2: Choose your Facebook user
Click Connect to open the flow. Select the user account to connect through. If you have just logged in, we preselect that user for you. The count next to each user shows how many businesses that user already has connected.

Step 3: Choose your connection type
Pick how you want to connect:
- Brand Level Connection. Connect a page to represent your brand. This unlocks brand features (Social posting and Reviews). Choose this if you have a brand page, whether it is a parent page or a standalone page.
- Location Level Connection. Connect all your locations without a brand page. This is a bulk connection and does not include brand features.
Which should I choose? If you want to post and reply to reviews from a brand page, choose Brand Level. If you just want all your locations connected and do not need a brand page, choose Location Level.

Step 4: Select your page (and finish)
What you see depends on the connection type and the page you pick.
Reading the page list
After you choose Brand Level, we show every page your user has access to:
- A parent page appears as "Brand + X location pages", with the location count and the page's follower count.
- A standalone page appears as a "Single page", with its follower count.
- Use follower count as a quick hint: your real brand page is usually the one with the most followers.
- Use View Page to open the page in Facebook and confirm it is the right one before connecting.
- Use Search to find a page by name.

Already connected pages are grayed out. If a page is already connected to another business or location, it appears grayed out with a label showing exactly where it is connected, so you do not connect it twice by mistake.

If you selected a parent page (Brand + locations)
You can toggle Auto-create Facebook location pages:
- On: We create Facebook pages for any of your locations that do not have one yet, nested under your brand page.
- Off: We connect only the pages that already exist.
Important: To auto-create location pages, the brand page must have a physical address. Without one, Facebook's API will not allow page creation.
Click Connect & Confirm to finish.
If you selected a standalone (single) page
You can toggle Connect remaining pages to locations:
- On: We connect your single page as the brand page, then automatically match your remaining pages to your locations based on name and address.
- Off: We connect only the single page and nothing else.
Click Connect & Confirm to finish.

If you chose Location Level Connection
You do not select a brand page. Review the summary and click Connect & Confirm. All pages are connected as individual locations, matched by address and store code.
If no match is found for a location, that page is not connected and not created. Location Level does not create any pages.
What happens after you connect
You end up with one of three outcomes, all visible on the Listing Connections page with the connection type shown:
- Brand only: Just your brand page is connected.
- Locations only: All your locations are connected, with no brand page.
- Brand and locations: Your brand page plus the matched or auto-created location pages.

Connect Instagram
Instagram connections are inherited from Facebook, so the setup mirrors your Facebook connection.
Before you can connect Instagram:
- Add a Facebook user with access to your pages.
- Connect a Facebook page.
Until both are done, the Instagram section will prompt you to complete the Facebook steps first.
Once Facebook is connected, the business appears under Instagram with the same connection type, inherited automatically. Click Connect. You will be asked to authorize Facebook for the additional Instagram permissions, and we link the pages for you.

Matching rules and important notes
Matching logic. Before you connect, make sure your location information on the platform matches the Facebook location address data. Otherwise the system may not recognize the location and could create a duplicate. If the store code matches the location identifier, the system matches the pages regardless of the address.
Page names are not overwritten. If your existing location pages have a different name than the brand page, the system does not overwrite those names. To rename a location page, switch into that page in Facebook and edit it there.
Keep your access active. If your admin Page Role is removed, or your password is changed, the connection is invalidated and must be set up again. The user must keep the granted permissions for updates to keep working.
Facebook connect scenarios
You can connect multiple platform accounts to one Facebook brand page structure. You cannot connect one platform account to multiple Facebook brand pages.
If you have several brands inside a single platform account, split it into separate accounts before connecting, so each brand connects to its own brand page