Introduction
In order to successfully connect your Uberall location with your Facebook page (individual pages or pages in the brand page/location page structure), there are some requirements that need to be met. Make sure to check all the points listed in this article.
This article will help you eliminate all possible issues if:
- you have connected your pages before, but got disconnected again
- you are trying to connect your Uberall location to your Facebook page, but cannot find the page listed in the options
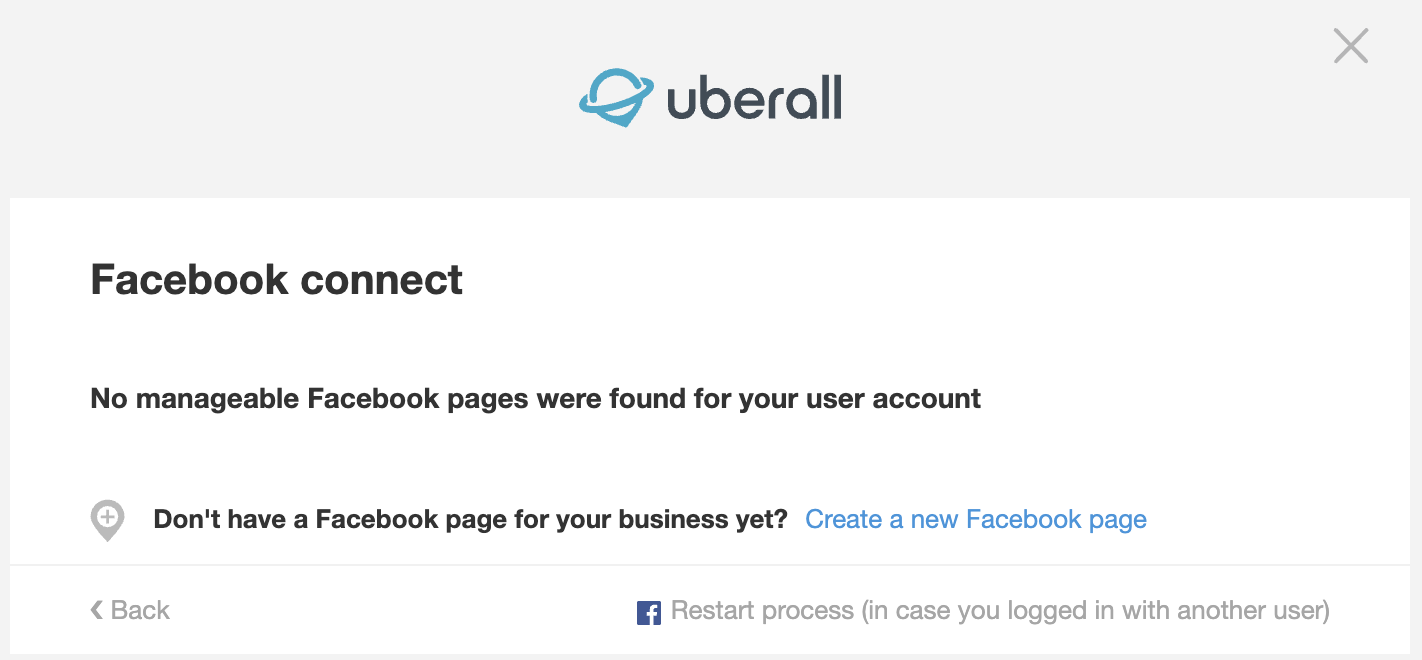
- encounter messages like this one:
How to use this guide
- The settings in the points below can be found in three different places and are indicated in each point:
- in your personal Account Settings
- in the Page Settings/on the Page itself (accessible from the Meta Business Suite and from Facebook directly)
- in the Facebook Business Account settings (only accessible from the Meta Business Suite)
- The instructions vary depending on if your page is still a Classic Page or in the New Pages Experience. Each point will have tabs with the according instructions.
- If you manage your page in the Meta Business Suite, also check the additional points.
Step 1: Check the general requirements.
In order to connect Uberall to Facebook, there are some general prerequisites that need to be met.
1. The page has an address that matches with the Uberall location.
Where: Page
For pages in the New Pages Experiences
- Log into Facebook, then click your profile photo in the top right.
- Click See all Profiles, then select the page you want to switch into.
- Then, click on the page's name in the left side navigation (under Home).
- You will then see the full page. Here, click on the tab About.
- Under the section Contact info, you can add an address.
For Classic Pages
- Log into Facebook, then click your profile photo in the top right.
- Click See all Profiles, then select the page you want to add an address to.
- You will then see the full page. Here, click on the tab More. Select About.
- You can then edit the address by clicking Edit Page Info or the pencil icon.
2. The Facebook page is active and published.
Where: Page Settings
For pages in the New Pages Experience
- Log into Facebook, then click your profile photo in the top right.
- Click See all Profiles, then select the page you want to switch to.
- Click your Page's picture in the top right of Facebook.
- Click Settings & Privacy, then click Settings.
- In the left side navigation, click Privacy and then click Facebook Page Information.
If your page is published, you will see the option to temporarily deactivate or permanently delete your Page: 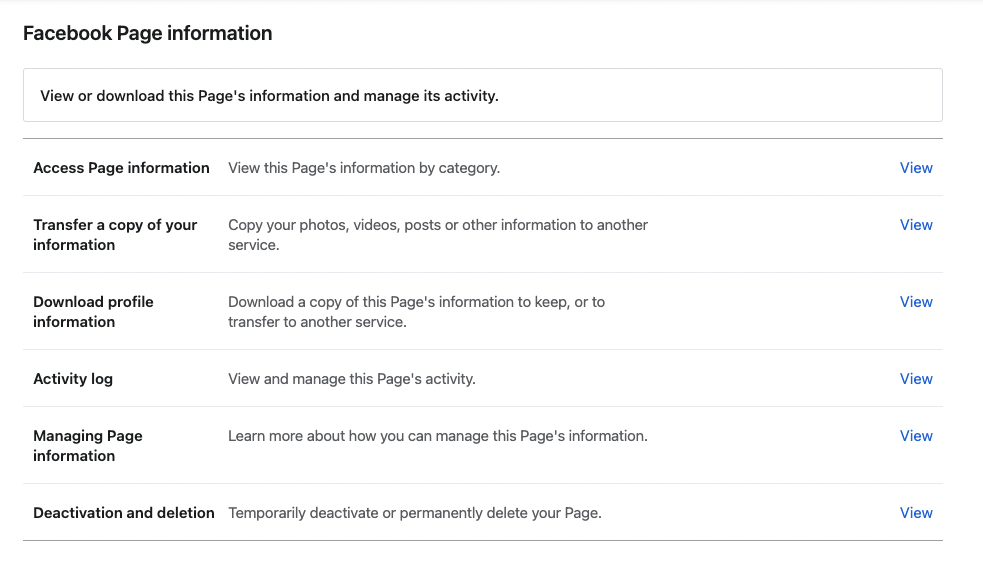
If your page is deactivated or not published, the page will not be listed under See all Profiles after clicking on your profile photo in the top right. In that case, reactivate your page:
- From your main profile, click your profile photo in the top right.
- Select Settings & Privacy, then click Settings.
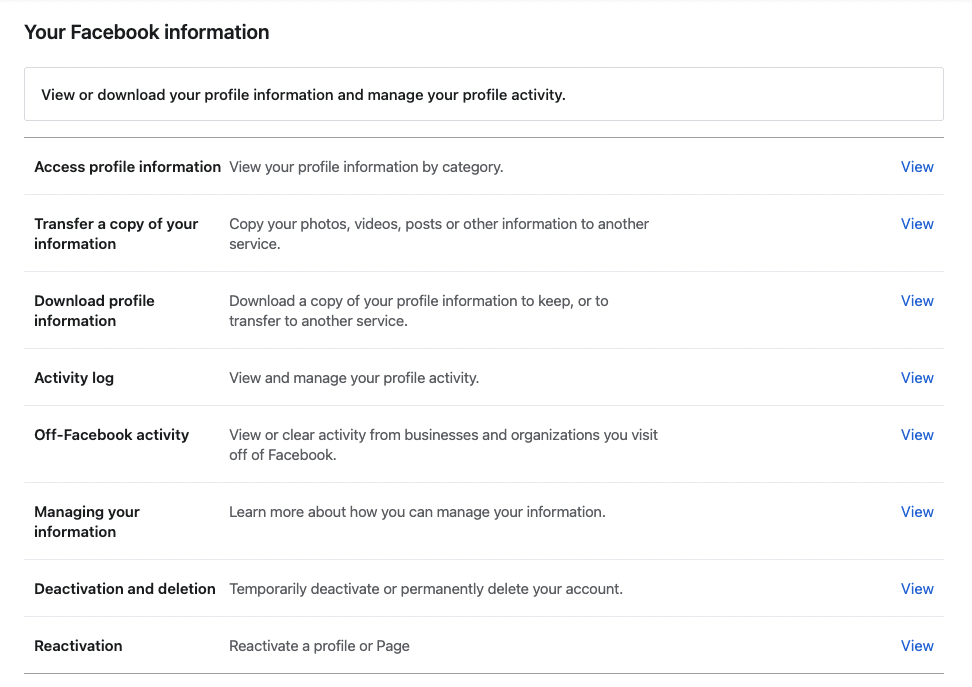
- Click Privacy, then click Your Facebook Information.
- Under Reactivation, click View and then Reactivate.
For Classic Pages
- Log into Facebook, then click your profile photo in the top right.
- Click See all Profiles, then select the Page you want to check people's page roles of (if you don't see the page here, click on See all Pages).
- In the left side navigation (titled Manage Pages and profiles), scroll all the way down and click Settings.
- This will open the Pages Settings and take you to the General settings.
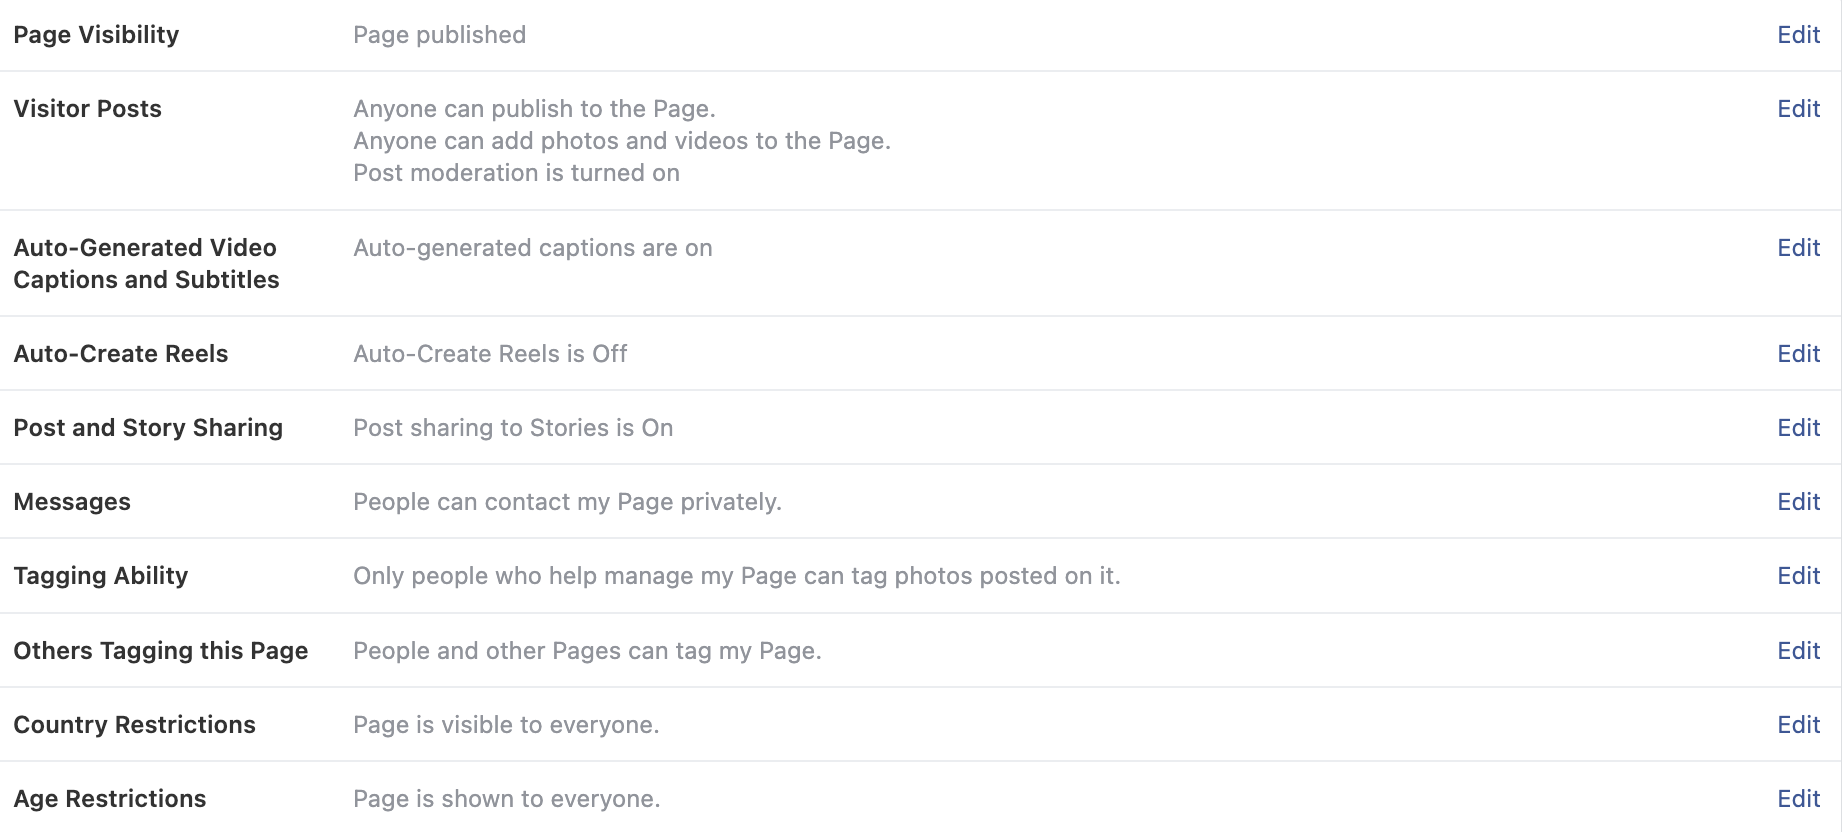
- Under Page Visibility, you can see if the page is published and edit it if needed.
3. The two-factor authentication is enabled for your personal Facebook account.
Where: Personal Account Settings
Since Meta is raising security standards, it is now mandatory to enable two-factor authentication for the Facebook account that connects the Uberall platform in order to avoid future disconnections.
- From your personal Facebook account, click your profile photo in the top right.
- Select Settings & Privacy, then click Settings.
- Click Security and login in the left side navigation.
- Under Two-factor authentication, click Edit and then choose one of the security methods.
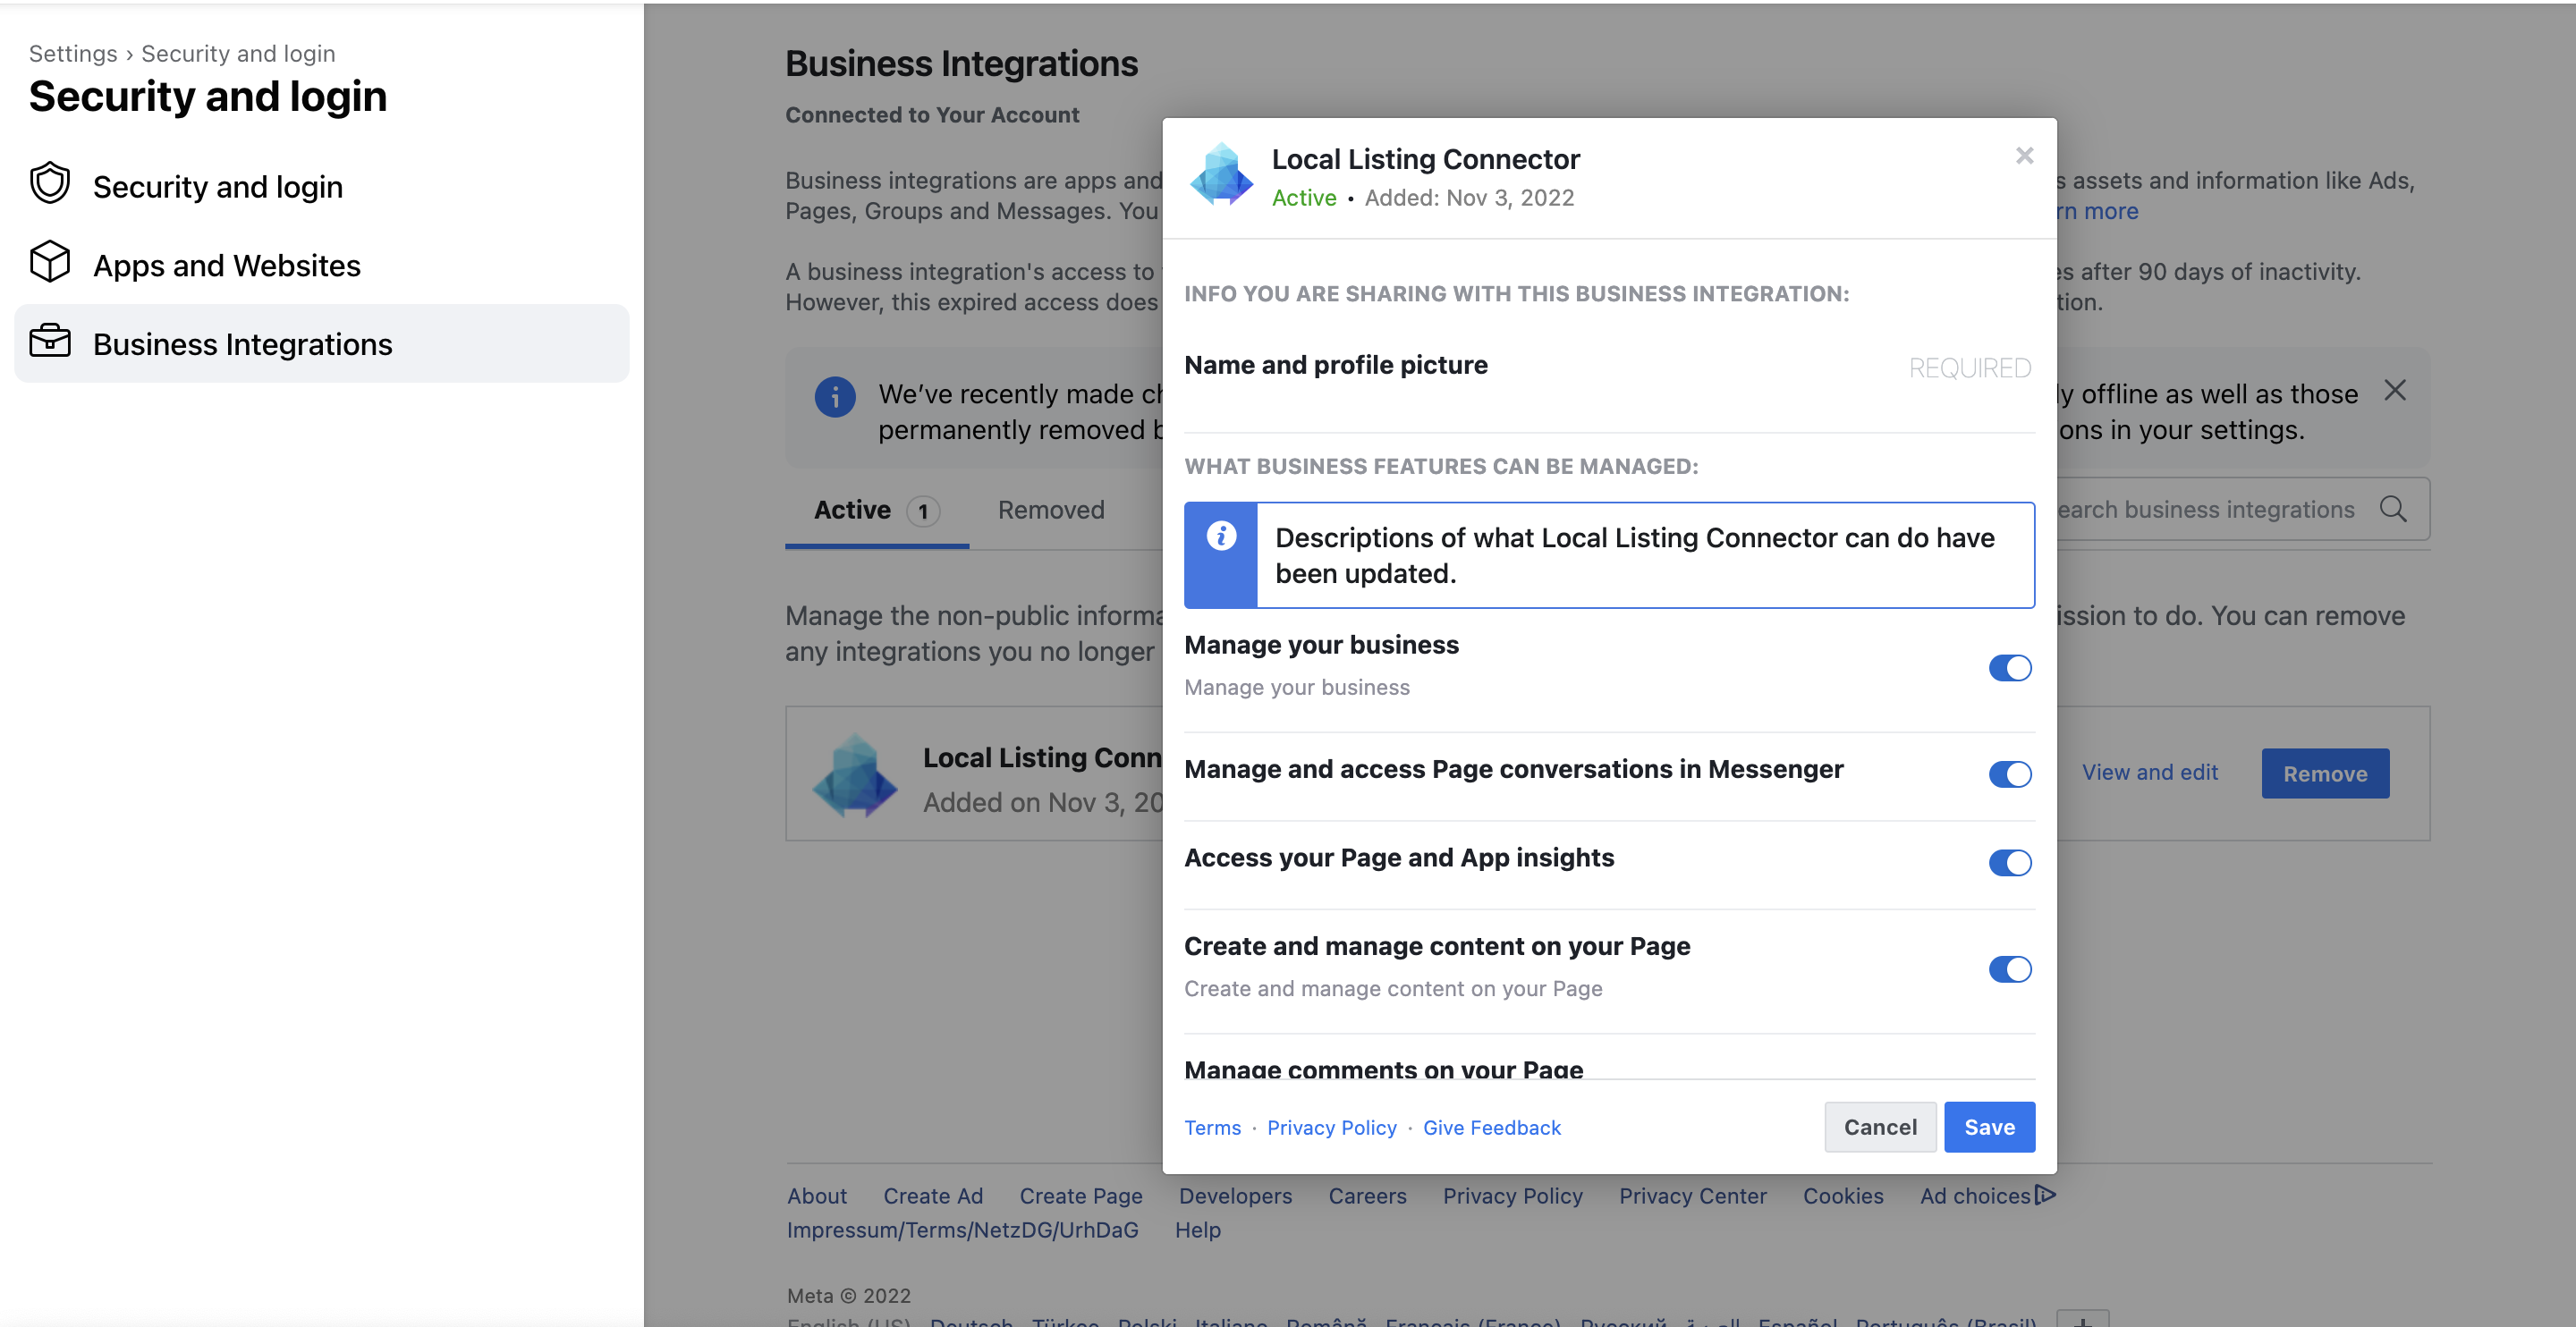
4. If your page has been connected to Uberall before: Our Local Listings Connector (business integration) has the right permissions.
Where: Personal Account Settings
Check if you have enabled our business integration with the required permissions to push updates, retrieve insights and/or post successfully to your Facebook page.
- From the Facebook account which you used to connect Uberall with your Facebook page, click the profile photo in the top right.
- Select Settings & Privacy, then click Settings.
- Click Business integrations on the left. You should then see our Local Listing Connector listed as active business integrations.
- Click on View and edit to check if all permissions are enabled (blue).
- If there are tick boxes and single pages visible, make sure to tick all of them regardless if these are locations you want to connect. If there are no tick boxes and pages visible, you have done everything correctly.
5. In case you are using a dummy Facebook profile: A profile picture has been uploaded.
Facebook is constantly checking profiles for their credibility. If you are using a dummy profile in order to not share private information, make sure to at least set a profile picture and some general information in order to not get blocked by Facebook.
DeleteIf you manage your page in the Meta Business Suite as part of a Facebook Business Account, also check these additional points:
6. Your Facebook account has access to the Meta Business Suite (formerly Facebook Business Manager).
Where: Business Account Settings
You can only access the Meta Business Suite if your personal Facebook account has access to a Facebook Business Account.
If you want to get access to an already existing Business Account, ask an admin to add you and to give you access either as a Business admin (full control over the Business Account).
If you would like to set up a new Business Account, you can do so by following the steps described here.
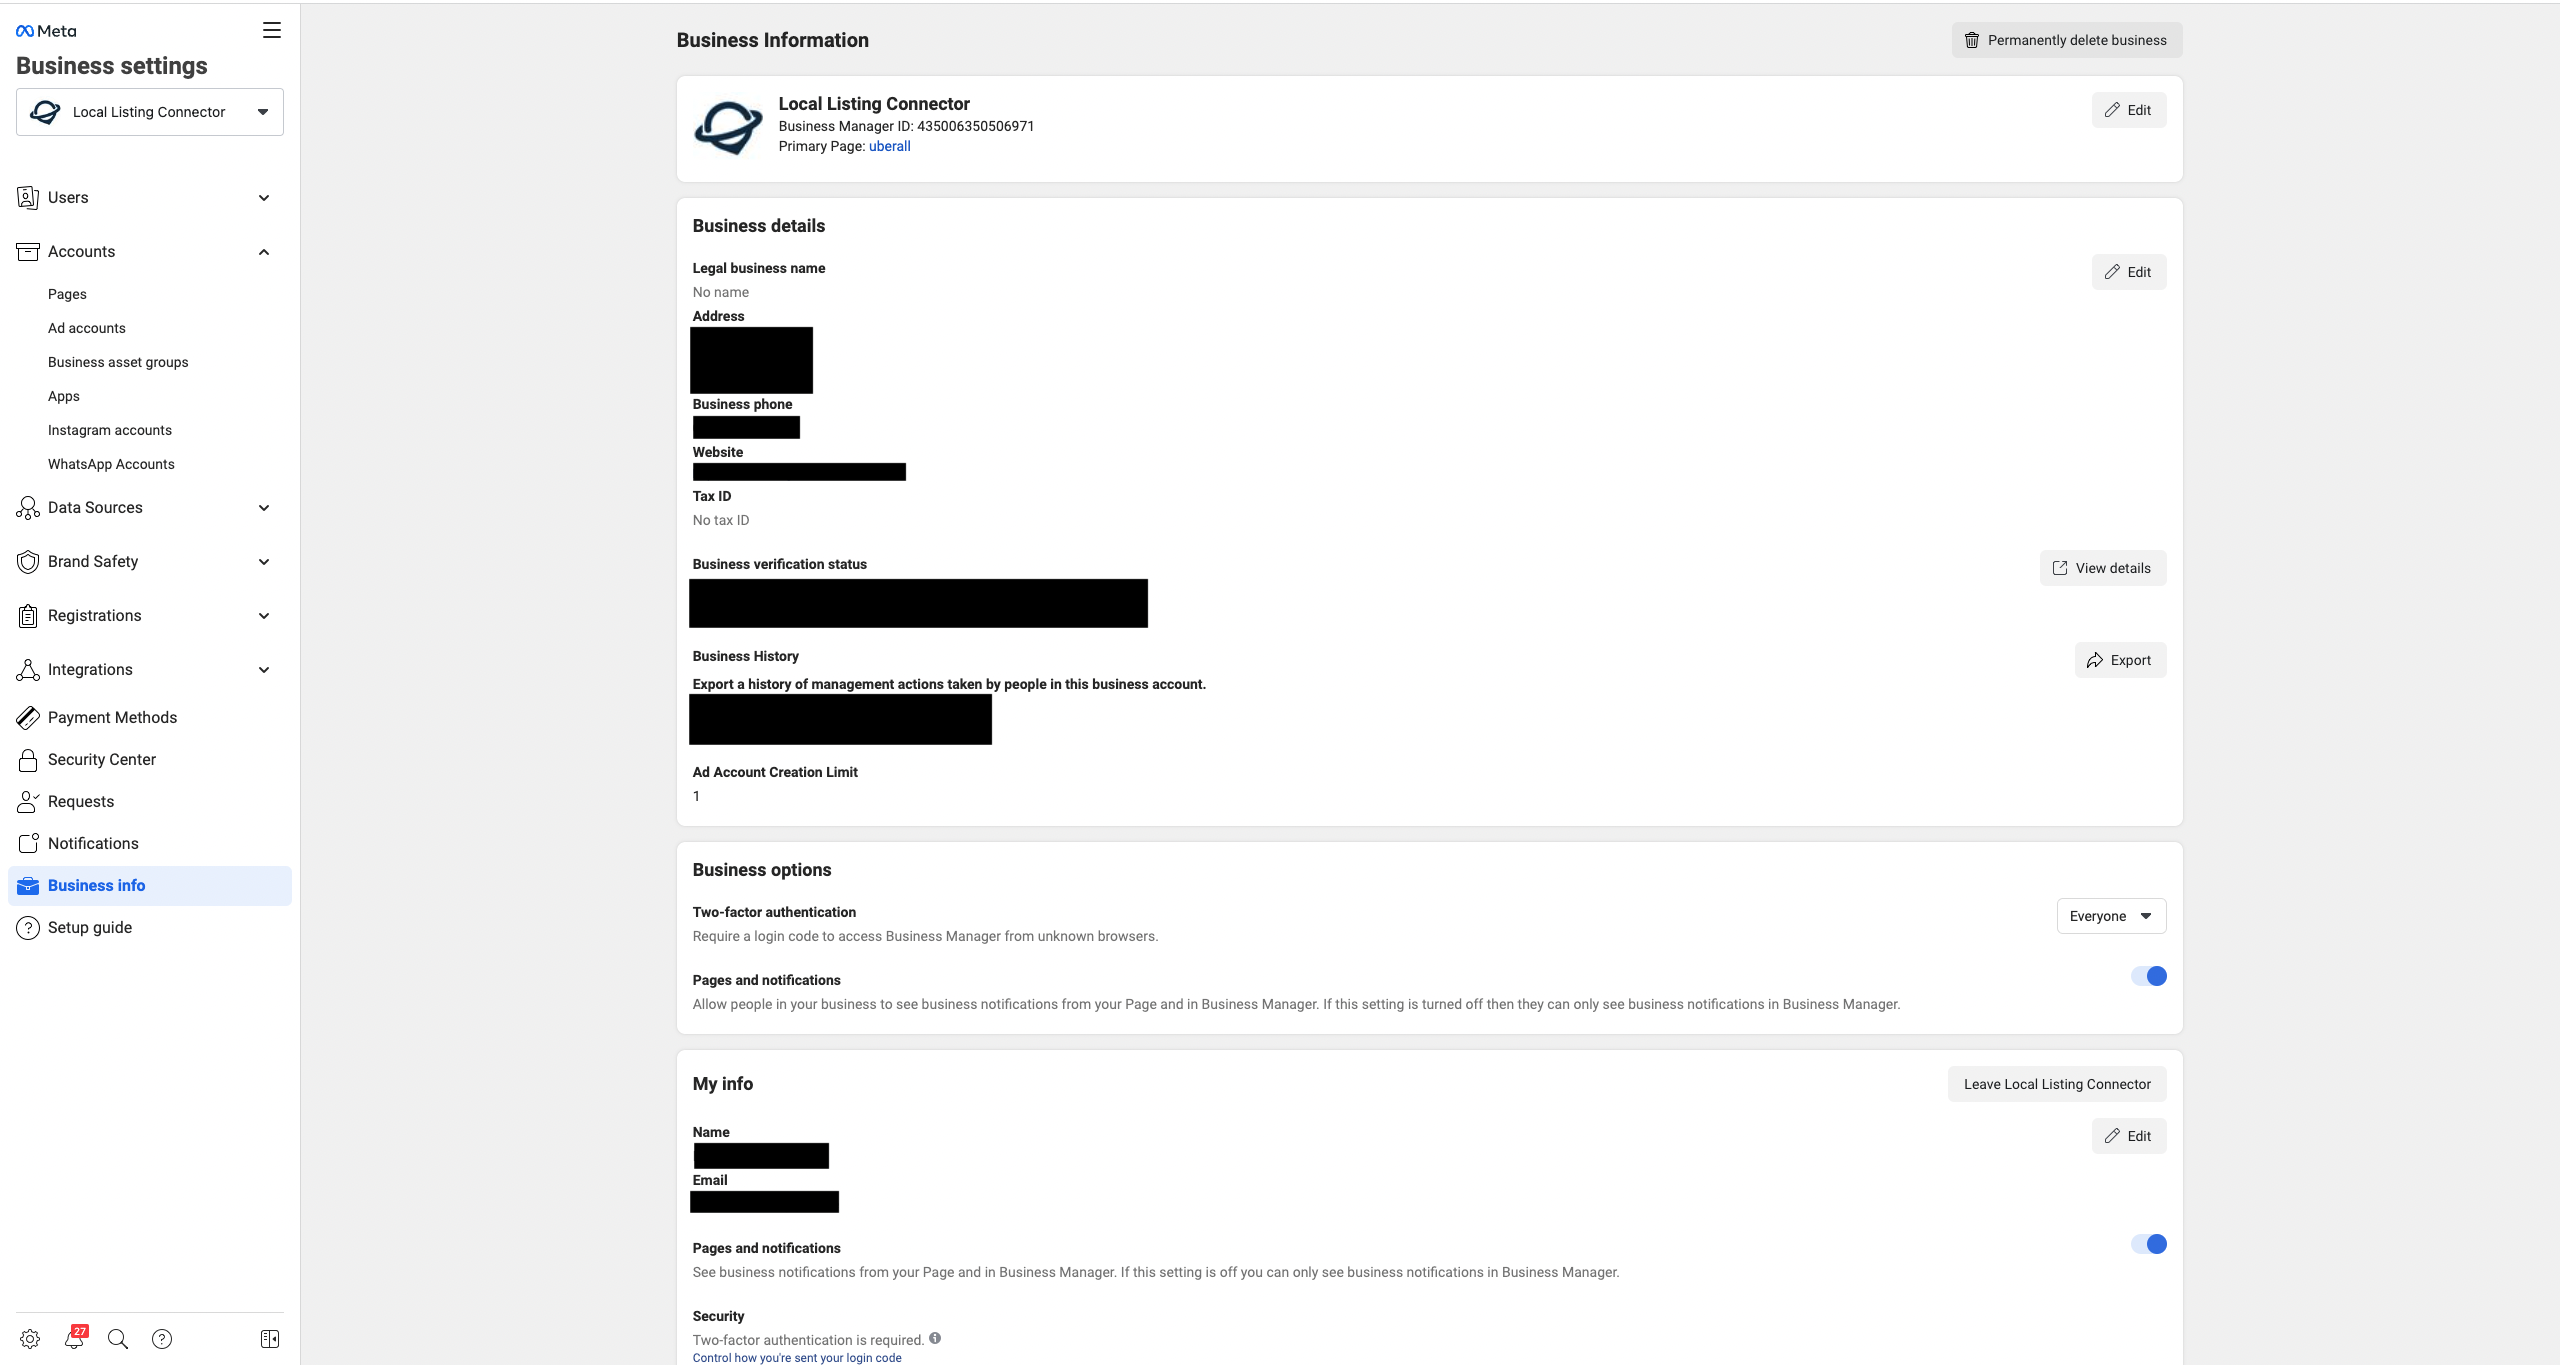
Delete7. The page has been added to the Facebook Business Account as an asset.
Where: Business Account Settings
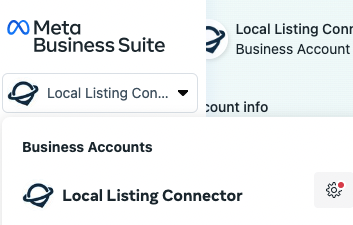
1. In the Meta Business Suite, click on the little gear icon next to the Business Account's name on the left side or on Settings on the bottom left.

2. Then, click Business assets. You will see a list of all pages that have been added to your Business Account as an asset. If you cannot find the page you want to connect to, you can add it by clicking on Add Assets on the top right.

3. In the next screen, select Facebook Page.
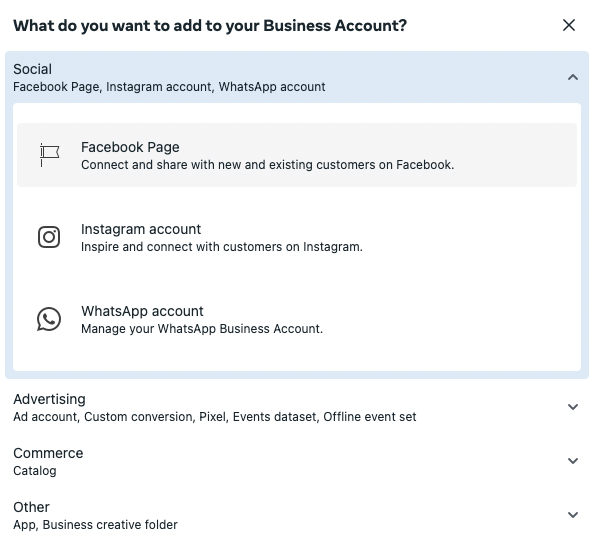
4. Then, select one of the options:
Claim an existing Facebook Page: The page will be moved to your Business Account and your Business Account will be the owner of the page.
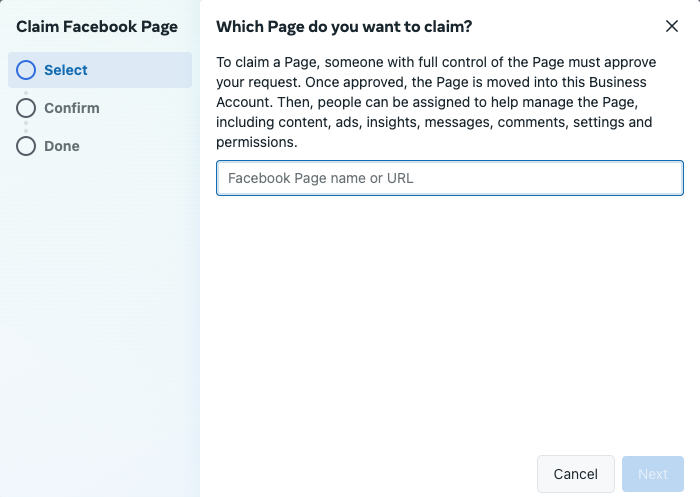
Find the respective page and claim it.
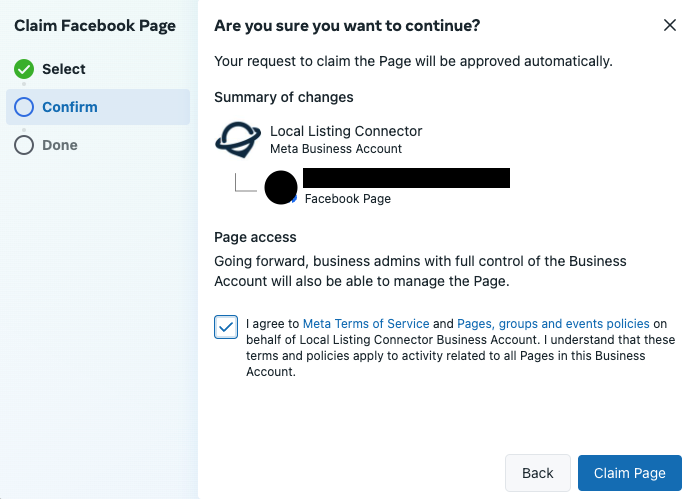
Request to share a Facebook Page: The page will show up in your Business Account, but the ownership will not change. Choose this option if for example you want to connect Uberall to the page on behalf of a client.
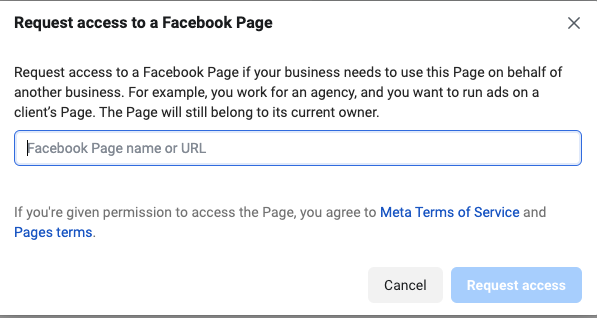
Find the respective page.
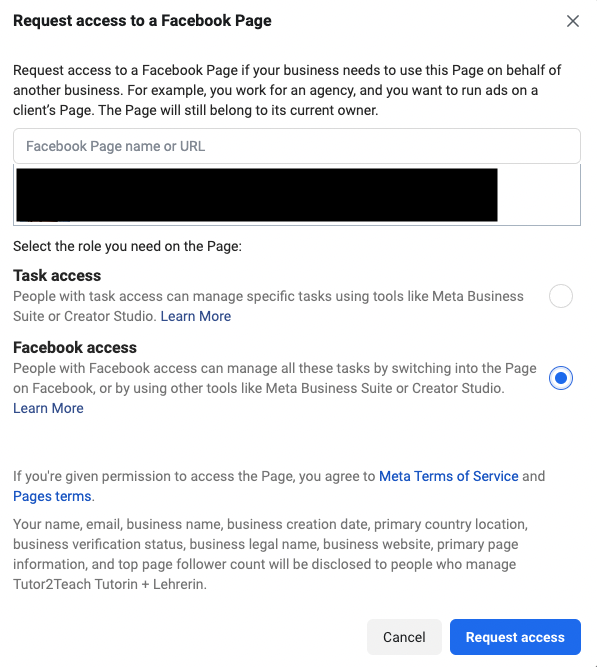
Here, make sure to tick the box next to Facebook access in order to enable all functionalities and in order to connect Uberall to that page, which will bring you to the final screen.
Click Request access.
Delete8. The two-factor authentication is enabled for the whole business.
Where: Business Account Settings
Since Meta is raising their security standards, it is now mandatory for Business Accounts to enable Two-factor authentication for every person who is part of the Business Account. You can enable it here:
1. In the Meta Business Suite, click on the little gear icon next to the Business Account's name on the left side or on Settings on the bottom left.
2. Click on Business Account Info.
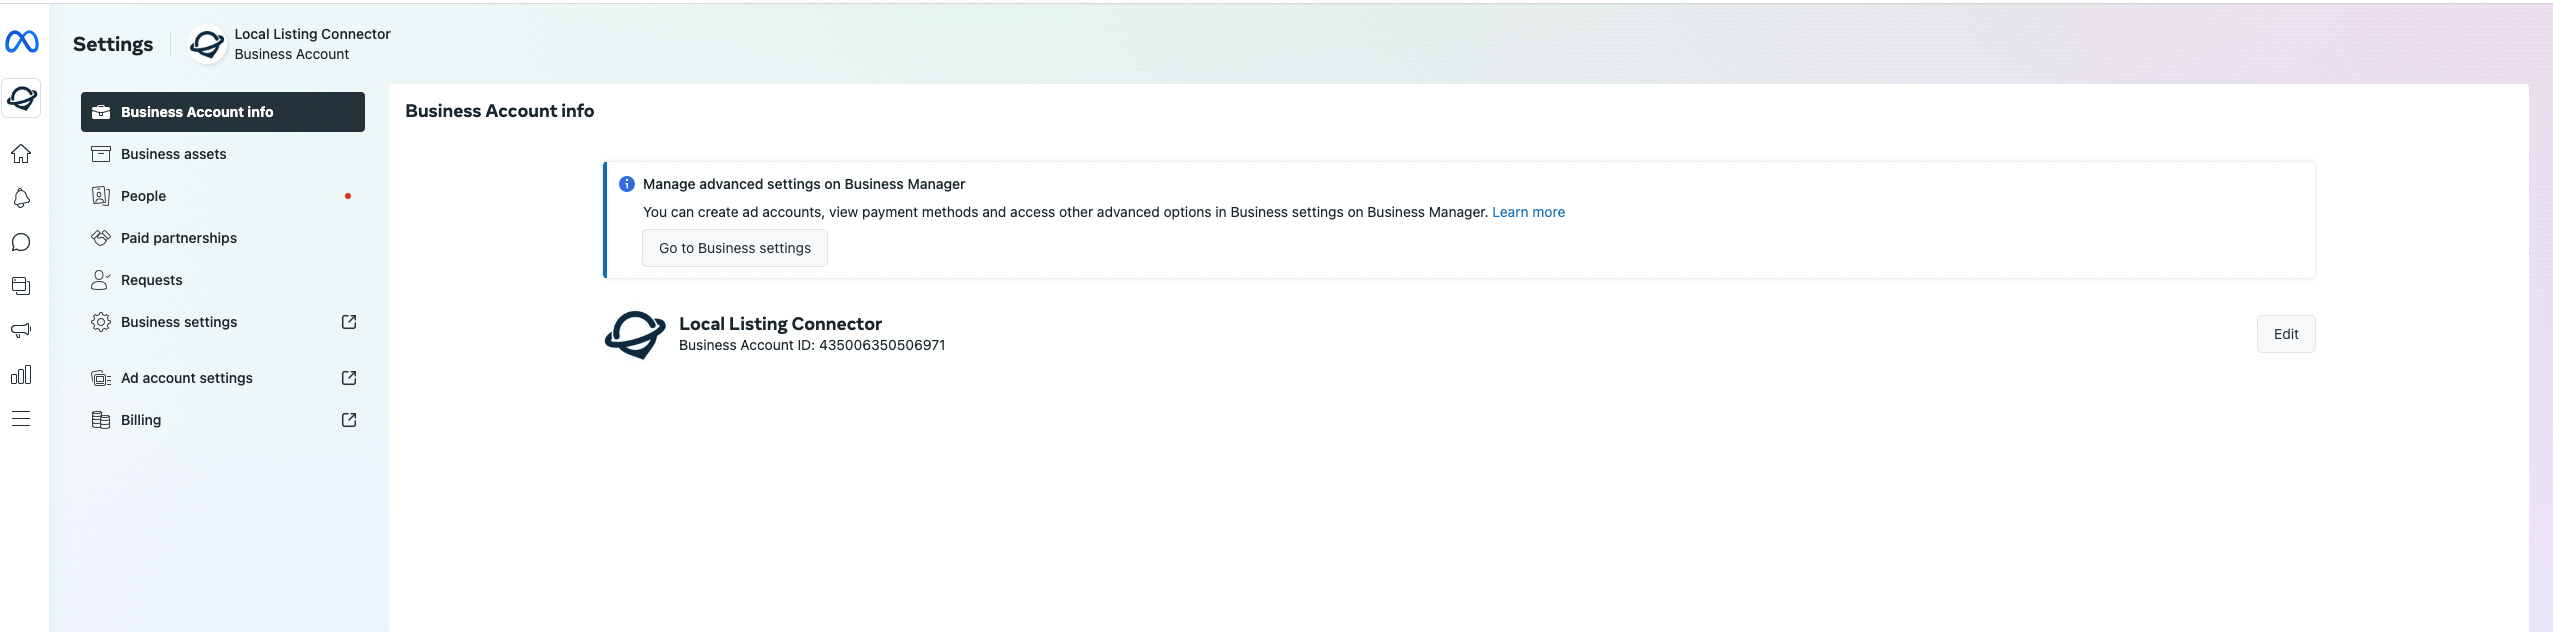
3. Click on Go to Business settings. This will take you to a new screen. Under Business options, you can enable the Two-factor authentication for Everyone.
Step 2: Check the page roles and access/control levels.
In order to set a person's admin rights for a Facebook page correctly so that Uberall can connect to Facebook through that person's profile successfully, different roles and access/control levels have to be checked and set to the highest level.
1. Your access to the page is set to "full control"/your page role is set to "admin".
Where: Page Settings
For pages in the New Pages Experience
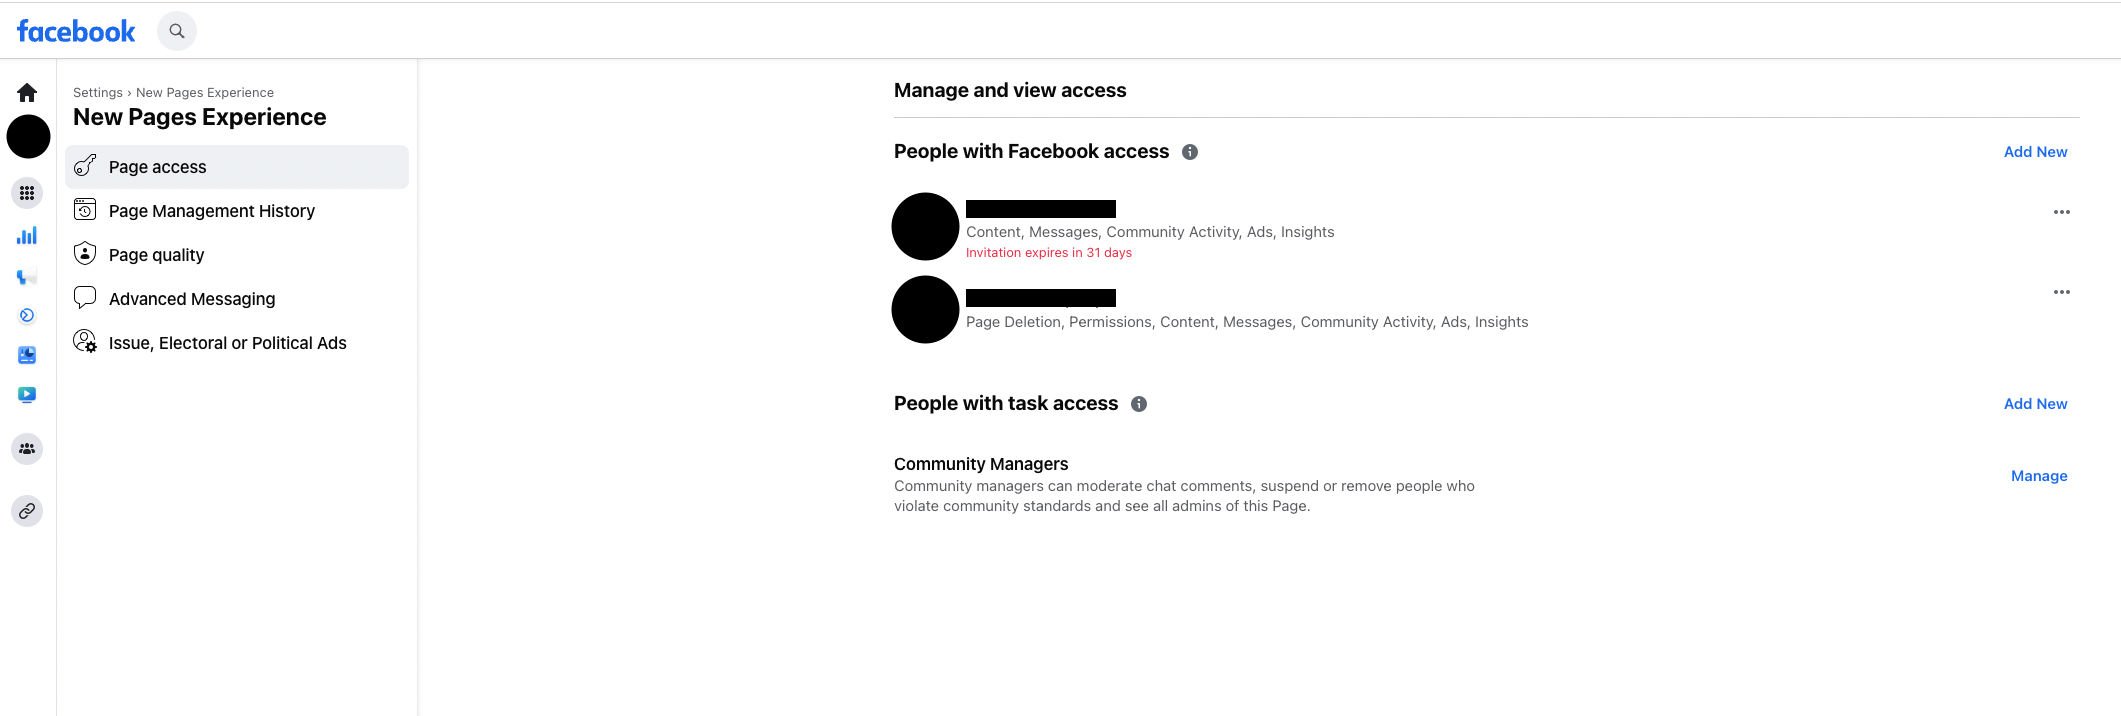
Check if people's access is set to "full control" for pages in the New Pages Experience:
- Log into Facebook, then click your profile photo in the top right.
- Click See all Profiles, then select the Page you want to switch into and check people's access to.
- Click your Page's picture in the top right of Facebook.
- Click Settings & Privacy, then click Settings.
- In the left side navigation, click New Pages Experience.
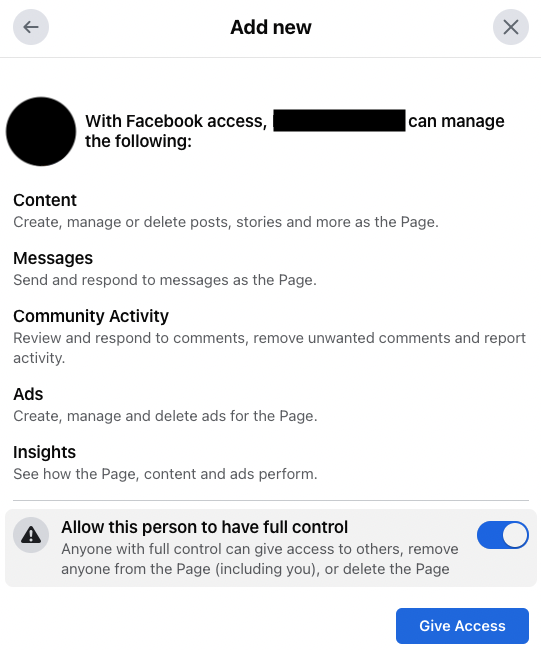
- You will then see the People with Facebook access (= full control). These people can switch into the page and manage it directly on Facebook, or by using other tools like Meta Business Suite or Creator Studio.
- Add New people in order to give them access to the page.
For Classic Pages
Check if people's page role is set to admin for Classic Pages:
- Log into Facebook, then click your profile photo in the top right.
- Click See all Profiles, then select the Page you want to check people's page roles of (if you don't see the page here, click on See all Pages).
- In the left side navigation (titled Manage Pages and profiles), scroll all the way down and click Settings.
- This will open the Pages Settings. Here, click on Page Roles.
- Depending on your page role, you will be able to see all the users and their assigned roles. Scroll down to Existing Page Roles and find your user.
If you manage your page in the Meta Business Suite as part of a Facebook Business Account, also check these additional points:Delete
2. Your Facebook Business Account Role is set to "Admin".
Where: Business Account Settings
1. In the Meta Business Suite, click on the little gear icon next to the Business Account's name on the left side or on Settings on the bottom left.

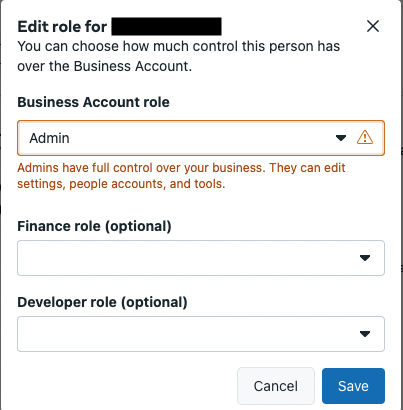
2. Click on People and select the respective person. Then, click on Manage in order to change the person's Business Account Role.
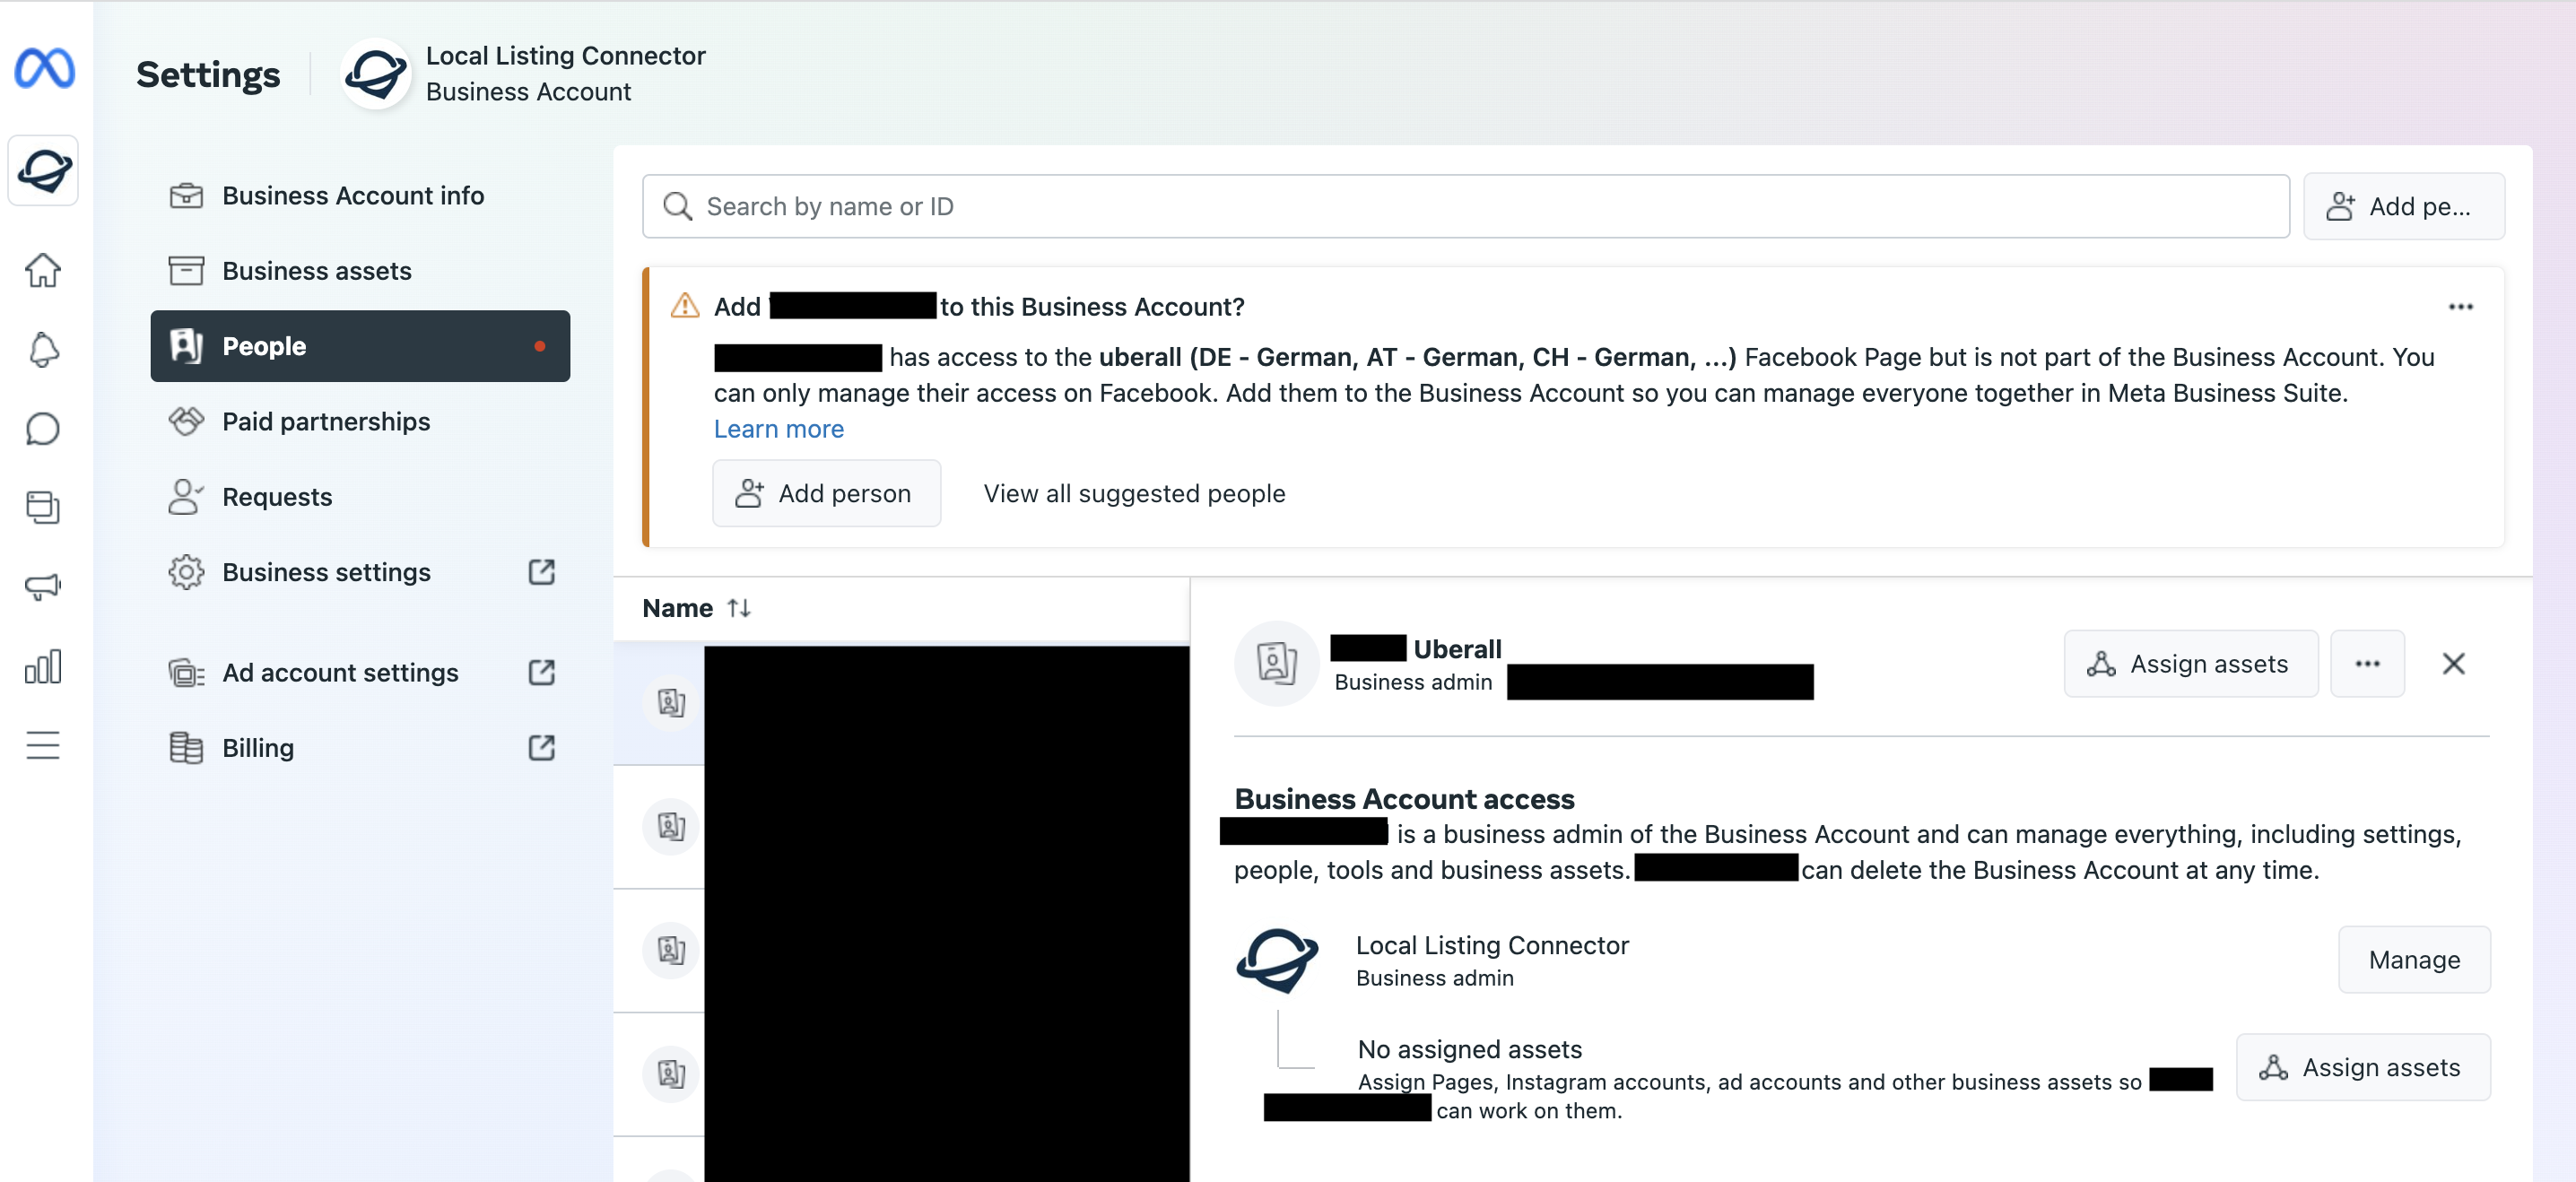
3. Set the Business Account Role to Admin.
3. The page is assigned as an asset to the correct person.
Where: Business Account Settings
You can check if people have certain pages assigned to them, and you can check who is assigned to certain pages.
Assets/pages assigned to a person
To check if a person has the page assigned as an asset:
1. In the Meta Business Suite, click on the little gear icon next to the Business Account's name on the left side or on Settings on the bottom left.
2. Click on People and select the respective person. Here you will see all pages that are assigned to this person as assets.
3. If the person doesn't have the page assigned as asset, you can click on Assign Assets.
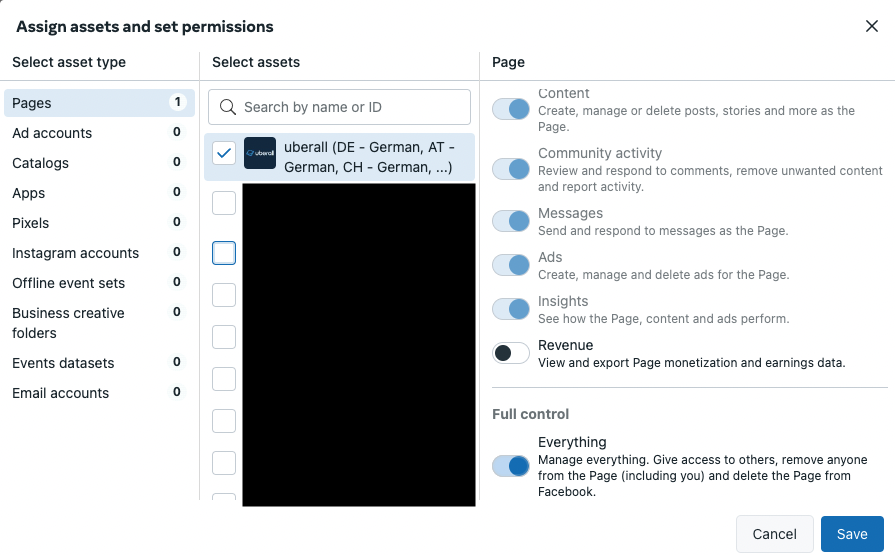
4. In the next screen, you can choose the page you want to assign to the person and set the level of control. In order to connect a Facebook page to Uberall, the connecting person needs to have full control. Therefore, please make sure to enable Full Control - Everything.
People assigned to an asset/page
To check who is assigned to a page and with which access/control level:
1. Got to Settings and click Business assets. Then, choose the page and click on Page access. You will a see a list of people that have this page assigned to them. The list is split into people that are not in the Business Account and People with full control - people in both sections can have full control over the page though.
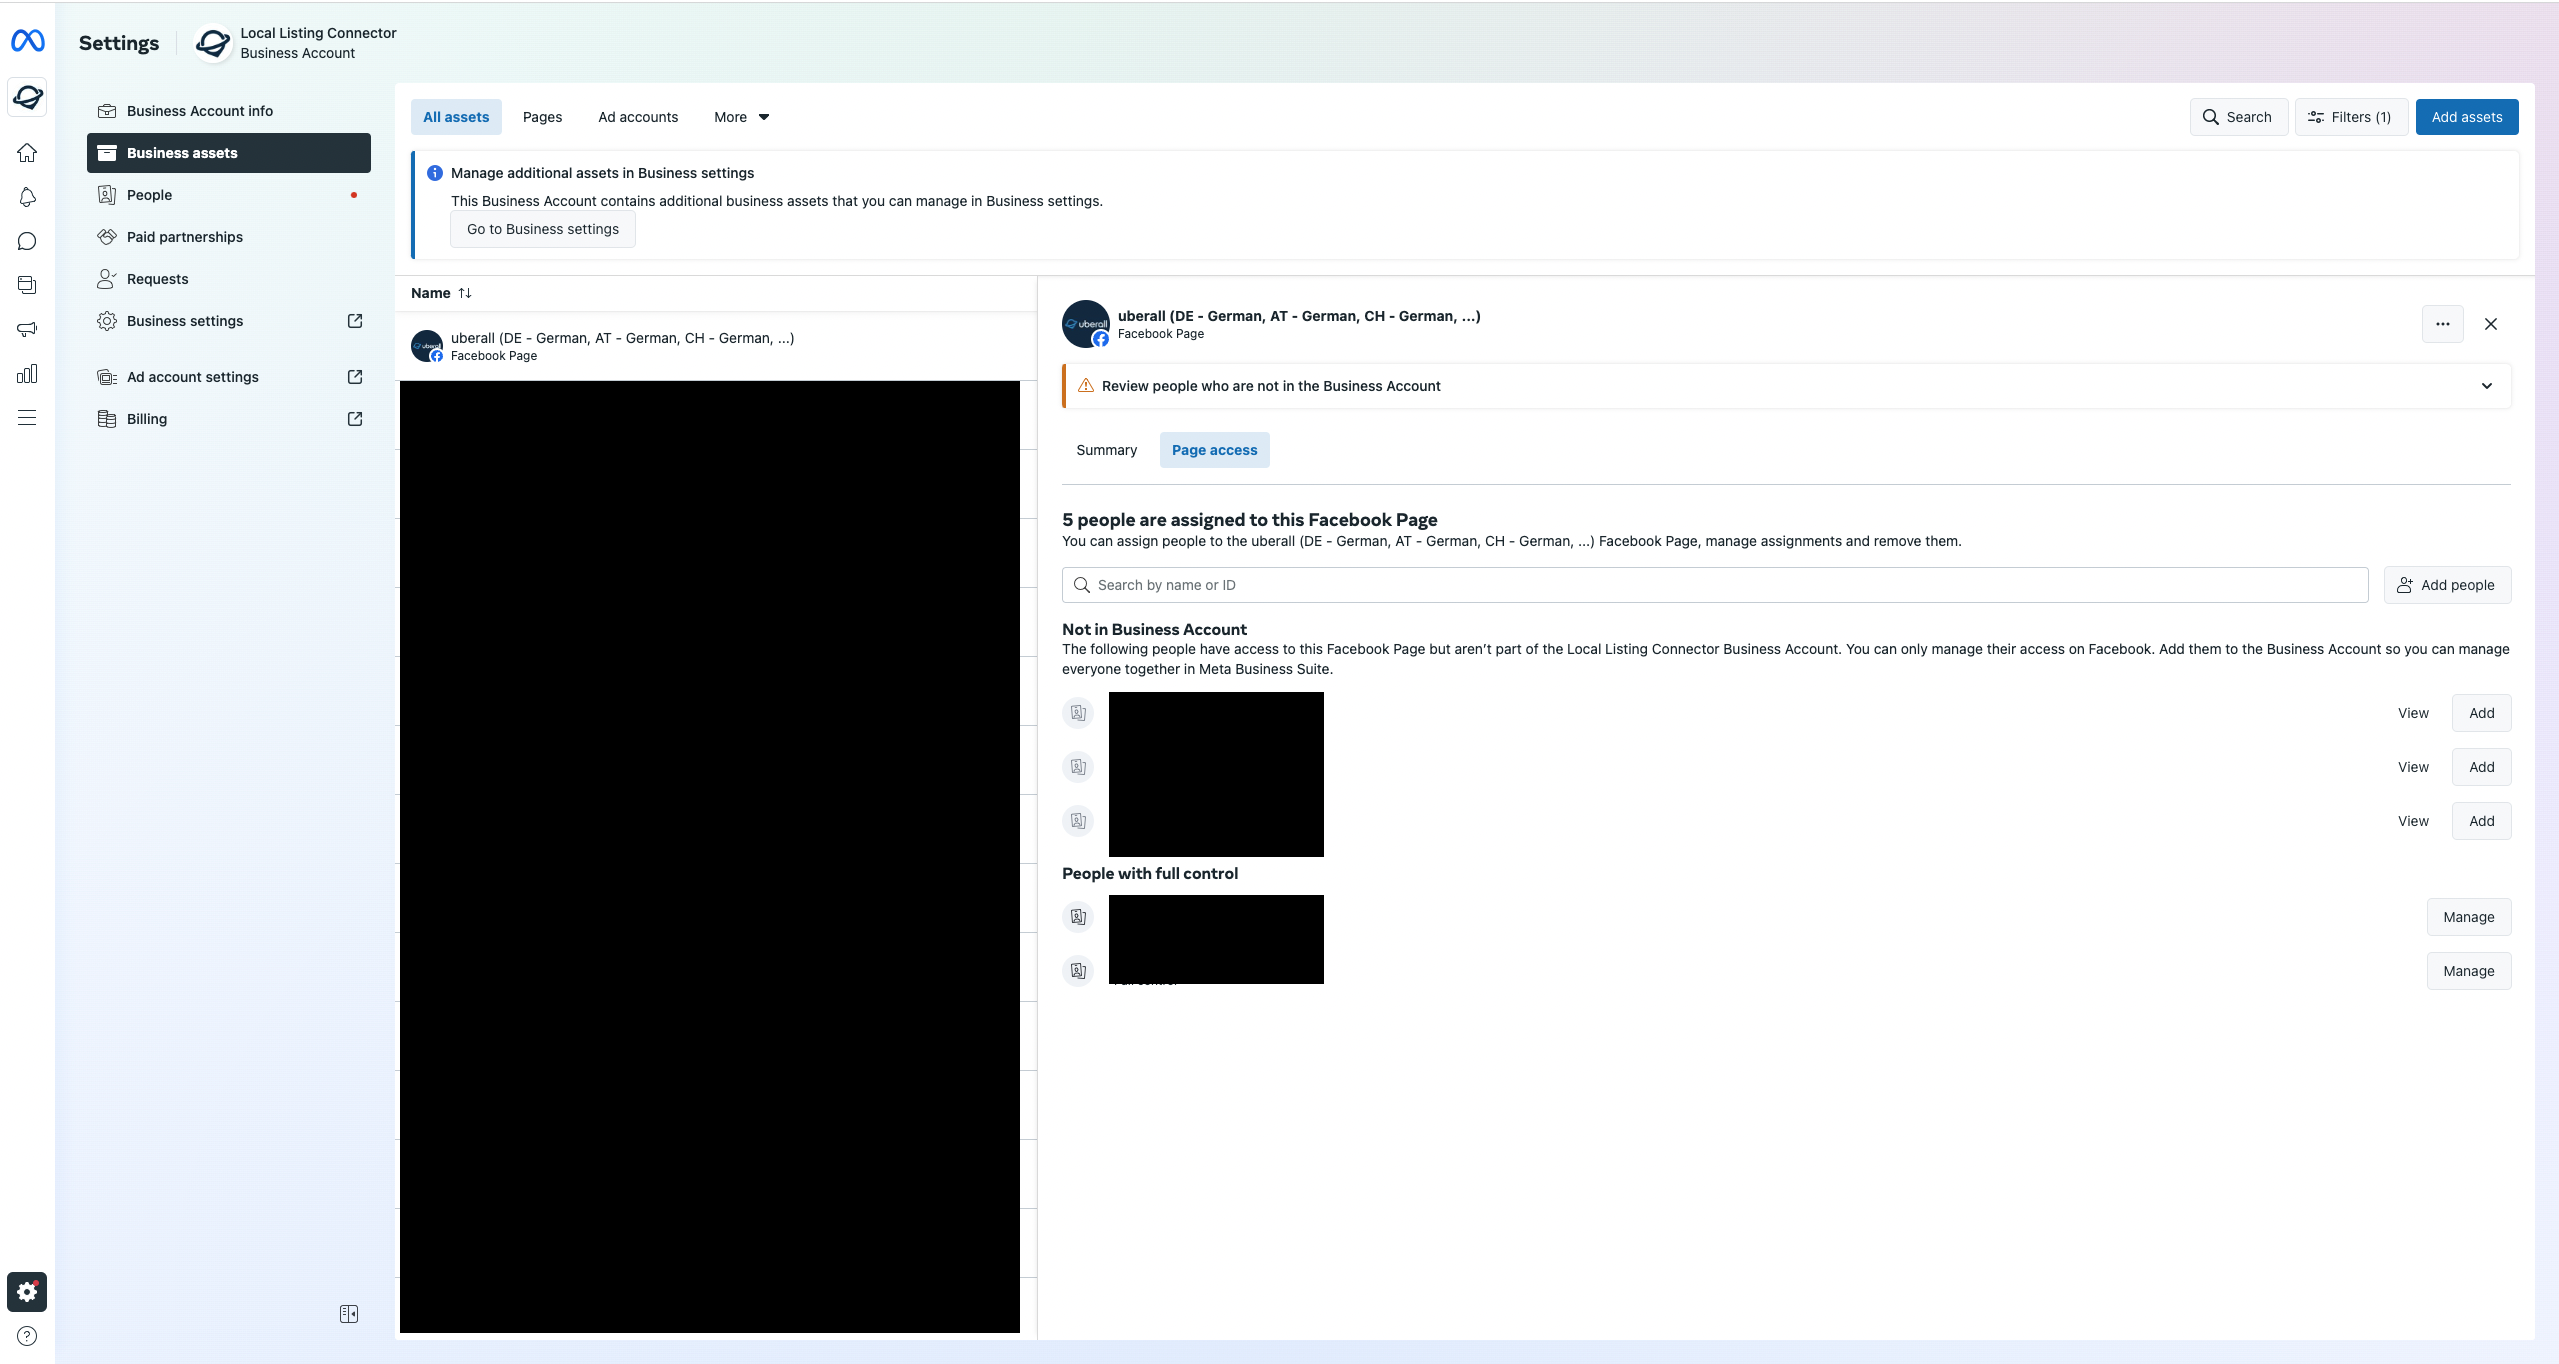
2. By clicking on View for the people that are not in the Business Account, you can see the person's access/control level for the respective page. As long as that person is not part of your Business Account, it is not possible to change the access level, which has been determined when the person had the page originally assigned to them as an asset.
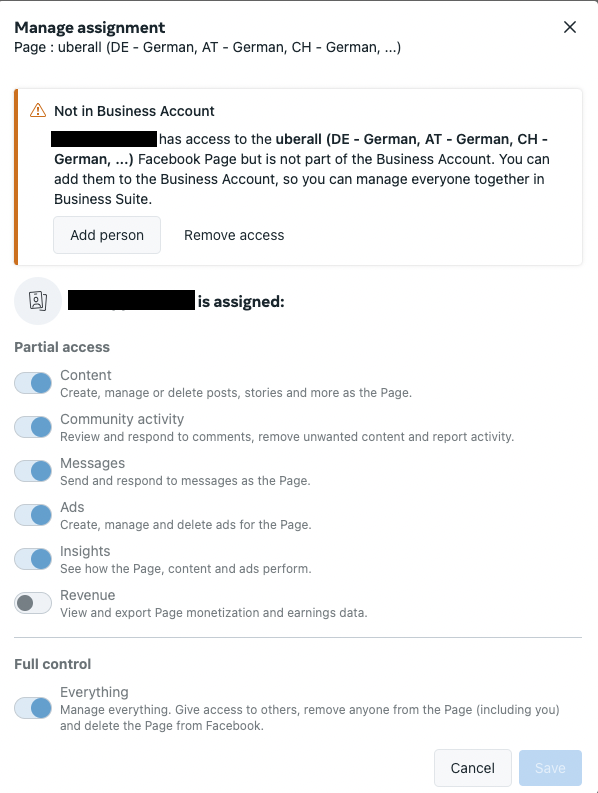
3. By clicking on Manage for the people that are in the Business Account/listed under People with full control, you are able to change their level of control. In order to connect a Facebook page to Uberall, the connecting person needs to have full control. Therefore, please make sure to enable Full Control - Everything.
Delete
More Helpjuice articles on Facebook:
- Checklist for connecting Facebook pages to our platform
- How to check your Page Role on Facebook?
- Facebook Business Manager
- FAQ about Facebook
- Facebook (FB) Connect Guide
- Facebook "Stores" Tab & Store Locator
Useful Facebook Help articles:
- About access for new pages
- Switch into your Page in the new Pages experience
- What’s the difference between my Facebook account and profile?
- Reactivate a Facebook Page
- Unpublish or deactivate your Facebook Page
- Meta Business Suite Introduction
- Create a Meta Business Suite Account
- About Page roles and access