Custom Filters for Locator & Pages
Learn how to implement additional, advanced, filters for Locator & Pages
Table of Contents
Table of Contents
Creating a New Advanced FilterSetting Values for Advanced FiltersAdding Advanced Filters to the StoreFinder WidgetExamples
Out of the box, the Locator & Pages product allows for filters to be determined based on the Services associated to locations. The utility of Advanced Filters is to expand the filtering possibilities to custom values, values that are not necessarily meant to be shared with external directories.
Creating a New Advanced Filter
End-users cannot create or delete an Advanced Filter, this needs to be requested through operations@uberall.com. A new Advanced Filter must be defined by a field name that is not currently in use - an Advanced Filter cannot be named name since this field already exists. Once the name of the Advanced Filter has been communicated (the name must not include spaces or other spacing characters), the support team will create the field on the back-end and make it available for all locations.
Setting Values for Advanced Filters
Import File
Once the Advanced Filter field has been created, it is now possible to make updates to this value on a location level through the platform. The new field is available through the Import/Export feature only. A new column is visible in the export Excel file with the same name as the Advanced Filter. Values can be added, removed and edited in that column depending on which value is supposed to be assigned to a location. Multiple values can be assigned to a single location using the semicolon (;) to separate each value.
API
Advanced Filter values can be assigned to individual locations using the PUT /api/locations/$id endpoint of the API. Note that with the PUT method, any pre-existing value will be replaced by the new payload. Make sure to pass the full list of Advanced Filter values when making these updates.
This example shows an update to the temperature filter values. The value array is not plural!
PUT https://uberall.com/api/locations/$id

{
   "locationFilters": [
       {
           "name": "temperature",
           "value": [
               "no",
               "yes",
               "high",
               "low"
           ]
       }
   ]
}
Adding Advanced Filters to the StoreFinder
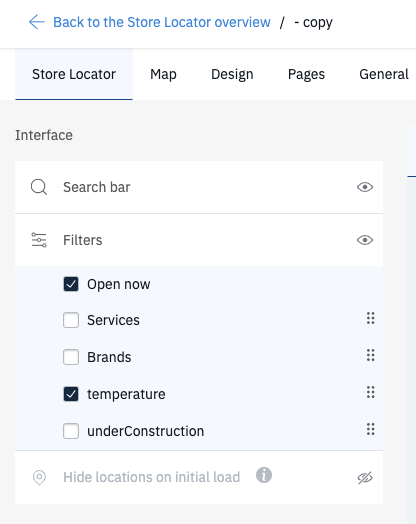
Now that the Advanced Filter exists and it has values to be displayed or used as filters, it needs to be used in the Store Locator. To do this, go to the Locator+Builder tool and select the advanced filter from the list of available filters.
Related articles: